Category Archives: Crafty Crafty!

Finally Making the Family Passport Wallet

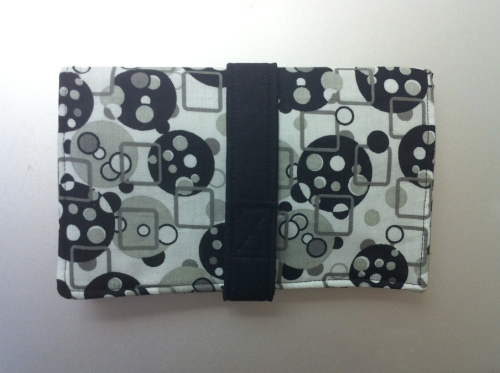
closedwallet.jpg

Two Christmases ago I gave Dave a paper gift bag. Inside it was a handful of fat quarters, half a yard of interfacing and a velcro strip. Also, the pattern for the Family Passport  Wallet.

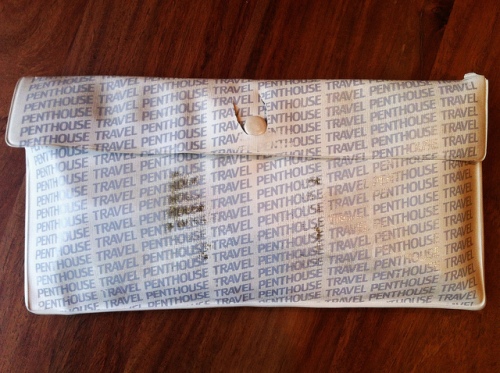
For the past 23 years, we’ve been traveling with our passports and boarding passes in this:

oldwallet

Awful, right? I’d intended to make the new travel wallet and give it to Dave that Christmas, but that didn’t happen what with December being December … and also Christmas. So he got all the materials in a baggie, along with the promise that I would sew it as soon as I could.

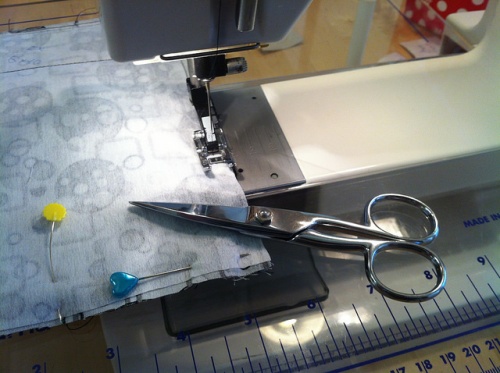
Fast forward a year and a half and I’m visiting Kelli for the weekend. I know I can take one small sewing project with me, and the travel wallet it was!

walletinprogress.jpg

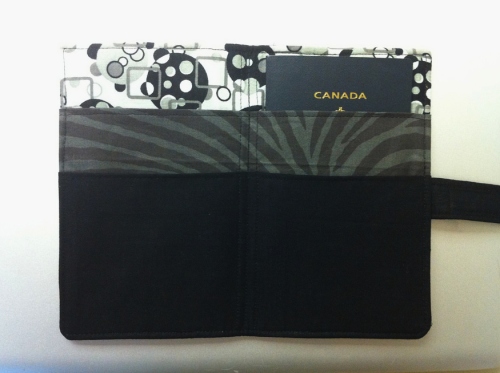
With its clean lines and many pockets, this project is all about neat pinning, carefully ironing and precise stitching. It sewed up in an afternoon over a glass of wine and a bowl of guacamole and tortilla chips.

openwallet.jpg

I am very happy with the result!

Forty Days of Lent: Fifteen Minute Project – 15 and Quit!


Lent-250x206


Not sure if this falls into the 15 minutes Surface project or the Spend fifteen minutes and then quit one!

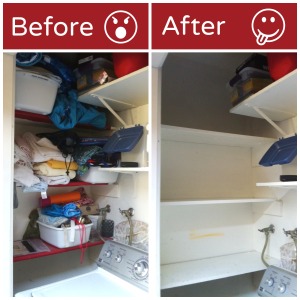
One of the joys of living in Southern California, is that your washer and dryer are often located in a closet outside the house. And no one likes to talk about it, but when it rains or the weather gets cooler, all kinds of critters make their way where it is warm and dry. Hence, rat poop on the shelves in my laundry closet. I know.

rat2

I had a 45-minute gap between work and picking up Tau for karate. So I donned disposable gloves, a face mask, and went at those shelves with my vacuum cleaner and disinfectant.

gloves

I also purged the piles of old towels and assorted pool toys that we store in that closet, and will wash (in hot water) the remaining pile before putting it back. I stopped with three minutes to spare, and just enough time to change my tee, wash my face and hands, and head out to karate!

laundry


Forty Days of Lent: Fifteen Minute Project – A Kitchen Cupboard

Catching up on a couple of 15-minute de-clutterings. You can find out more and play along here.

For my birthday in late February friends gave me a set of beautiful new Crate ‘n Barrel champagne flutes. Other friends gave me a new set of martini glasses.

Either my friends think I don’t drink enough or they know the new glasses will be well used!

Anyhow, this led to me purging our glassware cupboard last week. Out with all the nasty plastic kidware — keeping only what we USE — and the Mexican glass goblets we probably haven’t used in a decade, and in with my pretty new glasses.

kitchencupboard

Turns out the beautiful new flutes are too tall for our shelves, so I’m displaying them on top of the cupboard.

Lent-250x206

Forty Days of Lent: Fifteen Minute Project – A Corner


The second in my series of 15-minute declutterings. You can find out more and play along here.

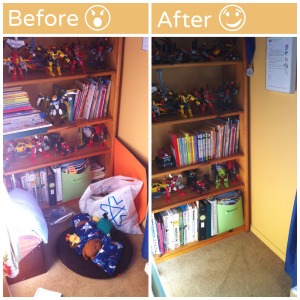
This is the spot in Tau’s room where toys that are not played with go to die get tossed aside. But he had a friend coming to sleep over and so we tackled his bedroom together.

corner

I know the before picture doesn’t look that bad — a plastic bag containing small gifts and stocking stuffers from Christmas (!), his stuffed animals in their pet bed (yes, we had to buy them a real pet bed from the store), and a pirate’s treasure chest, which contains at least five years’ worth of plastic birthday-party and fast-food crappy giveaways.

But consider that this project also involved purging and reorganizing the books and toys on the THREE bottom shelves, and making the floor so that you could walk on it again … at least until Tau’s friend arrived, and then 30 minutes later, it was covered in Beyblades and Lego all over again.

It was clear for those few moments — I have the picture to prove it!

Lent-250x206

Forty Days of Lent: Fifteen Minute Project – A Table


Lent-250x206
 

I decided to play along with Beth Woolsey’s 40 Days of Lent: 15 Minute Projects. My intention is to do at least five of these 15-minute purges throughout Lent, in the hopes that our home will be less messy and my mind feel less cluttered!

Maceo’s room doubles as my craft area — he’s too young to care! And the craft table and shelves, of course, become the dumping ground for anything that doesn’t fit in his closet or that I don’t know what to do with just right at that moment.

Before

Truth told, this was more of a 25-minute project than a 15-minute one. The purging and neatening took a wee bit longer than 15 minutes. I then spent another 15 minutes after the tidy up framing those four little pictures you see on the wall below — the frames have been sitting on said craft table for at least two years, waiting! It feels SO good to get this done!

After

Image

Embroidered Onesie for Baby Solana


20121216-094421.jpg


This One Doesn’t End Like All the Others


I was so chuffed with myself. This month’s Fabric-by-Fabric One Yard Wonders sew along was the Eight-bottle Wine Tote.

Perfect Christmas gift, filled with eight bottles of wine, I thought. I’d whip it up in no time! Even better, I found this fun dotty home-dec fabric in the clearance pile at JoAnns. Festive but not overtly Christmassy. I was in and out of there for under ten bucks!

Then I got home and realized that the fabric I bought was not wide enough. No problemo! I had some coordinating brown sheeting that would work well for the second, inside layer. Then I read on to realize that I needed a yard of cotton batting to sandwich between the two layers of fabric. Duh! It does pay to read the instructions before going shopping.

Still determined to forge ahead, I found something in my fabric stash that would pass for batting and began. I sandwiched the layers together and pinned. I meticulously marked out my 2 x 2 inch quilting lines with tailor’s chalk, and started sewing.

And after three rows of careful stitching, holding the layers steady, I remembered why I don’t do projects that require quilting. Ever. Because I suck at quilting!

The brown side didn’t look too bad. See?

But oy! The dotty side! It was nasty and skew, with pinches and gathers in the wrong places, despite all of my careful sewing.

And this is where the wisdom of middle age kicks in. I took my shears and cut away what fabric I could from the mess, and saved it to use another day. And then I tossed the rest in the trash!

Life is too short for bad sewing projects.

Not that the project is bad mind you. Take a look at this pretty version of the eight-bottle tote! My lack of preparation and execution — and perhaps I do need that walking foot for my sewing machine after all — is absolutely to blame!


Again With the Swaddling!


Unlike Kelli, I loved sewing the swaddle blanket so much that I decided to make another one. This time for old friends Jana and Chris, who have just had a sweet baby girl called Joss!

I could not wait to get my hands on this pretty fabric! Dicy photos taken with my phone — sorry!

And yes, my obsession with perfectly applied 1/4″ binding! Or as Kelli calls it “death by bias tape.”

And thank goodness, Baby obliged and modeled the finished product!


Save-My-T-Shirt Pillow


Tau’s school is part of the No Excuses University Network, an organization that promotes college awareness and readiness at elementary, middle and high schools across the US.

Each class  at his school adopts a different college — usually the alma mater of the teacher — and they learn all about their school and its sports teams throughout the year. Every Monday the kids wear their college spirit tees.

Well, Tau’s UCLA Bruins shirt from last year was getting a bit snug, so I suggested he make a pillow out of it.  It’s been a while since we worked on anything from the Sewing School book, but this project was a hit!

I can see us making a Save-My-T-Shirt pillow each year!

Fabric-by-Fabric Sew Along: The Swaddle Blanket


Finished swaddle blanket

First off, thanks to my friend Joslin for conveniently getting pregnant so that I had a real babe in mind when sewing this fun, easy and very practical blankie, The Swaddle Blanket, which is this month’s project for our Fabric-by-Fabric One Yard Wonders Sew Along.

I have to admit that I was skeptical. With Tau and then Maceo, we used the Miracle Blanket, and loved it so much that I was not sure that any other swaddler would be nearly as nice, comfy or snug. Silly me.

Pink or blue, pink or blue? I subtly asked Joslin whether she was having a boy or a girl, but it’s still too early to tell. I’m not about to wait a few more months to find out, so I went unisex. Love this pretty flannel!

Materials

Ahem! Note: You need two packs of binding for this project. I didn’t read
the instructions carefully, so had to run back to the store.


Another note, make sure you get a generous yard of fabric, because there is little room for error when laying out this pattern.

My only (and very small) frustration with this project is that the paper pattern piece for the ties is printed within the borders of the pattern piece for the blanket piece (see below). Which is okay, because I pinned and cut out the blanket fabric piece first, and then cut out the pattern piece for the ties.

What you’re left with, though, is a very flimsy pattern piece for the blanket panel, should you ever want to make another blanket. See what I mean?

That aside, the swaddle blanket is super quick and easy to whip up. You simply  join the two ties with a classic French seam — shout out to my elementary-school sewing teacher for teaching me that at an early age!

Molly at work

Then bind the edges of the blanket and the tie piece separately with 1/4″ bias binding.

And this is the part where you learn what a lazy, impatient stitcher I am. I never pre-wash my fabric, I seldom use pins when I sew, and I only iron-as-you-sew when I know it will make the next step easier.

Pinning bias binding? Pah! For rookies and the feint of heart!

Attaching 1/4" bias

This was the first time I’d used the skinny 1/4″ binding, and you really have to go slowly and carefully to make sure you catch the fabric and keep your stitching straight!

See that beauty of a sewing machine in the picture above. That’s Molly, and it occurred to me that I should tell her story, but perhaps I will keep that for another post.

Once the binding is on, it’s simply a matter of attaching the tie panel to the blanket panel. The directions in the book give you exact measurements for placement.

Attaching the ties

Attaching the ties

Within five minutes of finishing the binding, I’d stitched the ties on and was ready to test the blankie’s swaddle power. Unfortunately, my babies are both too big now, but Maceo newest little friend, appropriately named Baby, was happy to oblige!

Finished swaddle blanket

Baby is a shorty-pants — about the length of a newborn — so you’ll see in this picture that the ties swaddle him a bit too low down on the body. If you want to use this blankie for a very tiny baby, I’d either sew the ties on a bit higher up than the pattern suggests, or you could just fold down the top edge of the blanket a bit to ensure that the tight swaddle starts around your baby’s shoulders.

How does this blanket compare to the Miracle Blanket? Very well! It’s soft, snug and won’t come undone. And — bonus! — I’ve already completed the first of the gifts I plan to make Joslin’s second baby girl. Or will it be a boy, J?!

Africa Close to the Heart


Dear Auntie Kelli,

We love our t-shirts. Thank you!

Shirt from Africankelli

Tee from Auntie Kelli

Love,
Tau and Maceo
xx

Fabric-by-Fabric Sew Along: Chic Carryall


The end of the school year, and Tau has had a phenomenal teacher, who has worked so unbelievably hard with us to keep Tau on track and learning well this year. Whip-smart as he is, that boy’s brain is too fast and detour-prone for his own good.

They should change the time-worn phrase from the “patience of Job” to the “patience of Mrs. Crow.”

For this month’s Fabric-by-Fabric One Yard Wonders sew  along, I chose the Chic Carryall as a thank-you gift for Mrs. Crow. And considering how hard she has worked with Tau on writing, I thought it would be special to personalize the bag with Tau’s handwriting.

No, he did not hand stitch it. But I did get him to write his teacher’s name on the fabric using one of those wash-off temporary sewing markers, and then stitched over his lettering. I also had him add a personal message on the pocket inside the bag: Love Tau xxx.

Filled with some summer magazines, I think she’ll love it, and I hope she’ll use it. Ladies and gents, the Chic Carryall!

This slideshow requires JavaScript.

Left Brain Veers Right

Every now and then, all the planets align, hell freezes over, and the pigs take flight. When our little left-brainer asks to do an art project.

Not just any art project mind you. We had to buy a $1 birdhouse at the art store and paint it because, he tells me, the old one, which he painted with his grandparents, is not looking so good anymore.

And painting is all about covering the surface with paint. Little to do with decoration. Once you have covered every inch of wood with paint, your job is done, and the materials can all go away, until the next time.

Fabric-by Fabric Sew Along: Paired Table Runners

Squeaking in just under the wire for this month’s Fabric-by-Fabric Sew Along.

I chose to make place mats because we needed a new set that we could easily chuck in the washing machine whenever they got grubby. I wanted to personalize them with our names, and when I saw this rich chocolate corduroy and fun pink and orange cotton print, I knew exactly what I wanted to do.

Two long runners, corduroy on the one side, embroidered with each of our names. On the other side, the cotton print that we can use when we have dinner guests.

Yes, they used four yards (!) of fabric, but they stitched up quickly, the fabrics look lovely together, and the embroidery turned out just as I’d hoped!

Only downer was that I didn’t pre-wash the fabrics, and the cotton-print side shrank slightly. Boo!

This slideshow requires JavaScript.

Fabric-by-Fabric: Shaggy-Chic Chenille Clutch


Shaggy Chic Chenille Clutch (Photo by Africankelli)

This month’s Fabric-by-Fabric One Yard Wonders sew along is the Shaggy-Chic Chenille Clutch.

My goal for the sew along is to use up as much of my fabric stash as possible! So I was happy to try this project when I found some old pillow-case scraps, as well as a some orange and white flannel.

I must admit that I had reservations about the project itself — I’m just not a shaggy-chic kinda girl. I was interested, though, to see how the chenille-ing technique worked.

The short of it? I’m not thrilled with the clutch because it’s just not my kind of bag. But I am thrilled with having learned how to make chenille! The method is so easy and forgiving, and would be great for making bathmats, pot holders, trivets, puppy beds or picnic blankets.

I’m also interested to see the clutches added to the Fabric-by-Fabric Flickr pool. So far, mine’s the only one that’s super-poofy! Per instructions, I used 9 layers of fabric, and washed and tumble-dried my quilted square before making up the clutch. What did everyone else do? Why is mine the only one with a ‘fro?!

Here is the visual step-by-step!

This slideshow requires JavaScript.